
Remote Positioner Motor Home Repair Guide

The remote positioner for Lynx photo-finish cameras is a popular add-on that allows for the remote adjustment of cameras from within the FinishLynx software. The remote positioner contains small motors that enable the camera to tilt, swivel, or pan while mounted atop a tripod. In some cases—especially during tight storage—a motor can be broken and will require repair. If you have a broken positioner motor, Lynx will send you the replacement and you can complete the repair at your own convenience. Rather than sending your positioner back to Lynx, you can save time and money by replacing the motor(s) yourself. The process is very straightforward. After receiving your replacement motors, please follow the steps below. 

To begin, find yourself a work area that is flat, clutter-free, and well-lit. 

Necessary Tools:

  • 1/4″ socket driver
  • 3/16″ socket driver
  • Medium Phillips head screwdriver

Note: Some older Positioners will require a 5/16″ socket driver as larger nuts were previously used. 

If you’re only replacing the Pan Motor, skip steps 5-6, 8. 

Step 1: Turn the Positioner so the back legs are closest to you. Remote Positioner

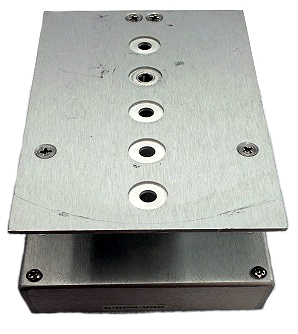
Step 2: Begin by removing the 2 short screws from the back legs of the mounting plate.

  • Remove the 2 long screws from the front legs of the mounting plate and remove the plate. 
    Remote Positioner Step 2

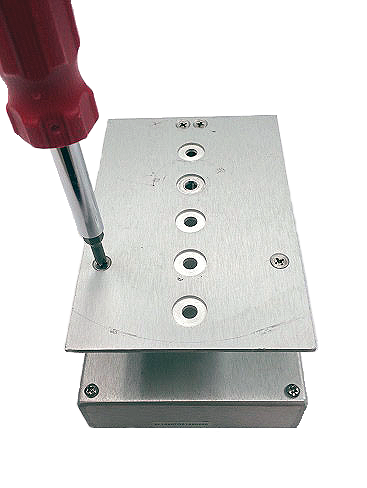
Step 3: Remove the 4 screws from the base of the Positioner.Remote Positioner Step 3

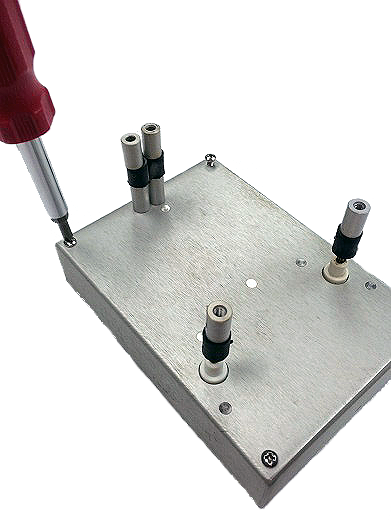
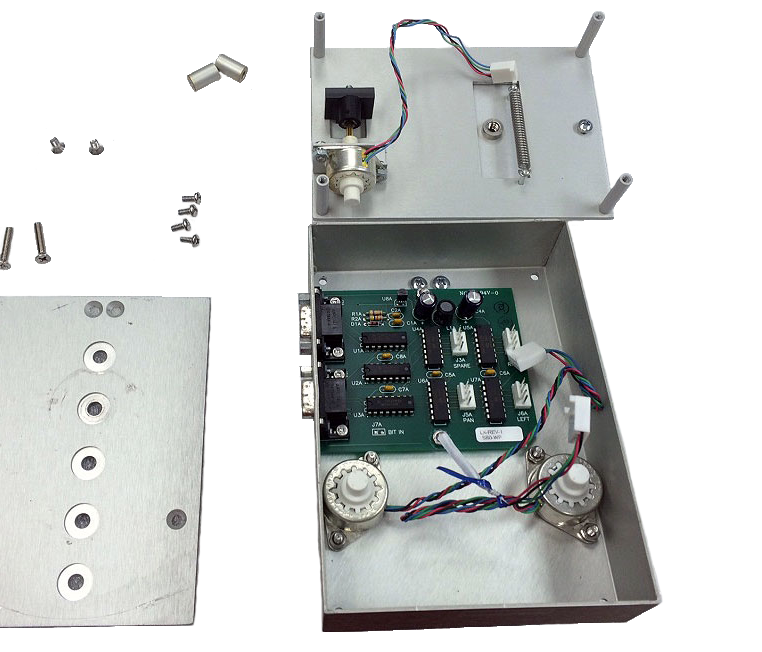
Step 4: Flip the Positioner over and remove the bottom plate. Unplug the 3 cables. 

Remote Positioner Step 4

Step 5: Using the 3/16″ socket driver, remove the 4 jack screws from the sides of the serial plugs.Remote Positioner Step 5

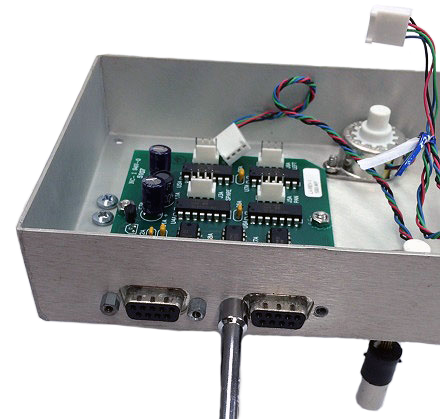
Step 6: Using the 1/4″ socket, remove the 2 nuts from the circuit board; remove the board by pulling up and away.

Remote Positioner Step 6

Step 7: Remove the nuts and washers from any broken motors. Transfer the stand to the new motor. 

  1. Replace the old motor with the new motor with the wires pointed inward. Remote Positioner Step 7
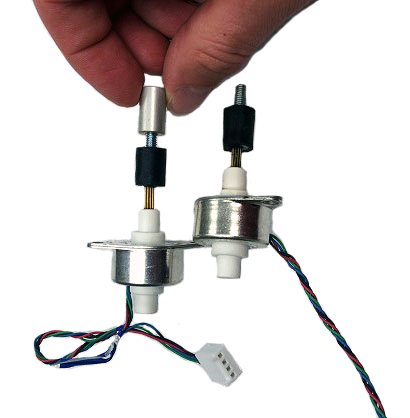
  2. Replace the washers and tighten the nuts.Remote Positioner Step 7b

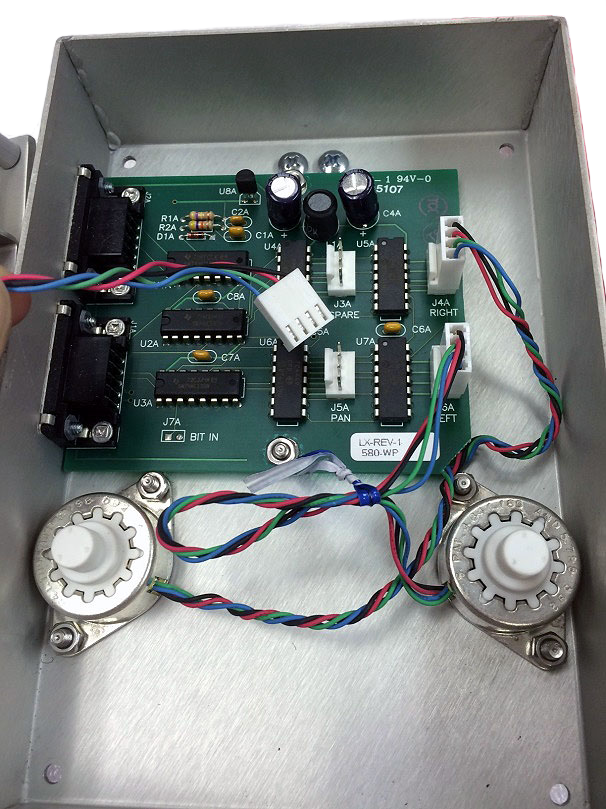
Step 8: Replace the circuit board.

  1. Tighten the nuts. (The motor mount nut may need to be adjusted for the board to fit.)
  2. Tighten the jack screws. (Over-tightening may cause the screws to break.)

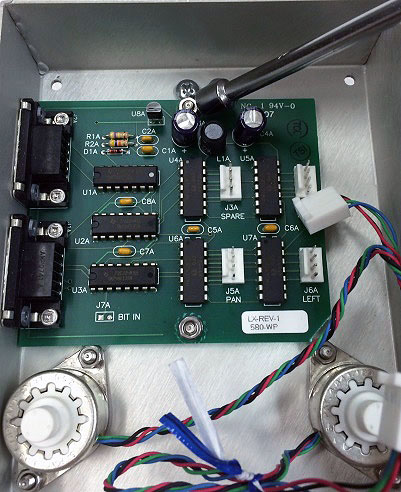
Step 9: Plug the motors into the board taking note of the labels and motor positions — right, left, pan

Also keep in mind that the motors are upside down and therefore reversed.

Remote Positioner Step 9

Step 10: Replace the bottom plate with the pan motor to the back.

Step 11: Flip the Positioner over and tighten the 4 screws on the base.

  1. Tighten the two long screws on the front legs of the mounting plate.
  2. Tighten the two short screws on the back legs of the mounting plate. 


If you need any additional help, please contact tech support: 978-556-9780 or support@finishlynx.com

Fix Vision Camera Ethernet Issues on Windows 10

Since the upgrade to Windows 10, many users have reported issues with the ability of the Vision camera to load to FinishLynx. Often, users will see the camera load only to have it red-line within moments.

A simple fix to the power management settings of the Ethernet port can solve this issue:

  1. Navigate to the Control Panel
  2. Open Device Manager
  3. Find the Ethernet Adapter (also possibly listed as Realtek Family Controller, Local Area Network etc.)
  4. Right click and select PropertiesDevice Manager Screenshot
  5. Select the Power Management tab
  6. Un-check the box that says “Allow the computer to turn of this device…”Power Management Tab
  7. Close the windows. Restart FinishLynx, power cycle the camera and attempt to load the cameras

If you continue to experience issues, please contact Lynx technical support at 978-556-9780 or by emailing support@finishlynx.com.

FinishLynx Software Version 9.10 is Now Available

July 22, 2016 – We have just released version 9.10 of the FinishLynx photo-finish sports timing software. Version 9.10 is the first major release in over a year and includes a host of new features. Some of the updates include:

  • New Smart Zoom feature that auto-fits the image in alignment mode
  • Lynx wind gauge feedback to support real time results with Regatta Master.
  • Zero gun test update
  • Easier AGC brightness access
  • Improved Enhance functionality
  • New Image Quick Adjust feature
  • 2 new shortcuts: Alt-B for White Balance and Alt-N for line labels
  • New Image Option defaults (including time tracking and show lines)
  • New scoreboard scripts (uTab3S_wind.lss & DakRTDExtended.lss) & script fields
  • New scoreboard running time controls (Run, Pause, Finish, Stop)
  • New LapTime features (RRS improvement and Edit Split option)
  • New Time Trial Mode improvements (split lines/overlays)
  • Improved “Find Time” flexibility in TT mode
  • Improved scoreboard support of start times for TT mode

View the release notes document for more details, photos, and a list of all the new features. Or check the release notes video below as we walk you through some of the new settings. To update your software, simply download the installer and input your serial number.

Download the Software & View Release Notes


FinishLynx 9.10 Release Notes Video

Enjoy the release notes video? Let us know by leaving a comment on YouTube.

Sending Team Scores from Hy-Tek to ResulTV

1.   Create a Hy-Tek Source in ResulTV using the settings below.

Note: Port can be set to any desired number.

Hy-Tek to ResulTV - Image 1

2.   Create a new layout in ResulTV for Women’s Team scores.

  1. Insert a new object
  2. Set the source to local override, selected sources, Women’s Team Scores
  3. Set the field to display the desired information (typically team place, team name, or team score)
  4. Repeat for each desired object in the layout

Tip: Use Copy [Ctrl + c] and Paste [Ctrl + v] to avoid setting the source for each object

Hy-Tek to ResulTV - Image 2

Hy-Tek to ResulTV - Image 3

3.   Repeat Step 2 to create a Men’s Team Score layout.

4.   Check that the settings in Hy-Tek are correct.

Hy-Tek to ResulTV - Image 4

Hy-Tek to ResulTV - Image 5

5.   Send team score information from Hy-Tek.

  1. Use Request 3 for Women’s Team Scores; Request 4 for Men’s Team Scores

Hy-Tek to ResulTV - Image 6

Learn more about ResulTV Live Data Display software here.

Capture Button Serial Port Unavailable; Now What?

Capture Button Unavailable
FinishLynx Error: Capture Button Unavailable Error

“Capture button serial port unavailable; keyboard capture will be used.”

This common error message appears when starting your FinishLynx software. There are two scenarios which would cause this message to occur:

  • You’re using Auto Capture and do not use the Capture Button. In this case, no further action is required. Simply click Ok and proceed with running your meet. The Capture Button Serial Port doesn’t need to be assigned as no Capture Button is being used.
  • You are using the Capture Button (either alone or in conjunction with Auto-Capture) and either 1) the computer assigned your adapter a COM port number that FinishLynx is not looking for, 2) you opened FinishLynx prior to plugging in your USB to serial adapter, or 3) the Capture Button has not been assigned a COM port number by the computer.
    1. Connect your USB to serial adapter to your computer prior to opening FinishLynx.  In FinishLynx, go to File | Options and locate the Capture Button dropdown
      • If your Capture Button’s COM port is listed, choose that and click OK.
      • If no COM port is listed, proceed to Step 2.
    2. Check that the USB-to-serial adapter is recognized by the computer in the Windows Device Manager with a COM port listed
      • In Device Manager, it will be listed under Ports
        • If the USB-to-serial device is not recognized by the computer, then you will need to install the appropriate drivers.  If you are using an ATEN adapter supplied by Lynx, click here to download the driver from our website (must have internet access).
      • Once you have confirmed your computer recognizes the USB-to-serial adapter and has assigned it a COM port number, re-open FinishLynx and go back to Step 1 above.

Note: Also check that the camera is set to manual capture in the Camera I | Options | Capture tab | Capture Method


Contact tech support with additional questions.

Diagnose Your RadioLynx Issues with a Paperclip

The RadioLynx Wireless Start unit is extremely popular with Lynx timers. While most won’t have issues, the goal of this post is to provide a quick way to troubleshoot the hardware if something does seem wrong.  If your software settings are configured correctly, you can troubleshoot why your RadioLynx may be malfunctioning using just an unfolded paper clip. Follow along with the steps below to help pinpoint what exactly is going on with your system.

Step 1 

With your FinishLynx system set up and turned on, remove the black and green plugs from the RadioLynx transmitter. Push the signal button in the top left corner to elicit a start.RadioLynx Paperclip Step 1

If no start is received, review your software settings and check internal dip-switches.

If a start is received, proceed to Step 2.

Step 2

Insert an unfolded paperclip into the black and green plugs of the transmitter and squeeze to elicit a start.RadioLynx Paperclipi Step 2

If no start is received, contact technical support.

If a start is received, the transmitter is working. Proceed to Step 3.

Step 3

Replace the cord by plugging in the black and green banana plugs. RadioLynx Paperclip Step 3 
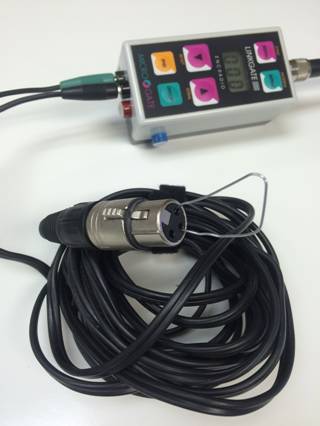
Remove the impact sensor. Insert the paperclip into the female XLR end numbered 1 and 3. Squeeze to elicit a start signal.

If no start is received, contact technical support.

If a start is received, the transmitter and cord are working. Proceed to Step 4.

Step 4

Replace the impact sensor. Blow into the sensor or tap into the palm of your hand.

If no start is received, the impact sensor should be swapped out with another or replaced.

RadioLynx Paperclip Step 4 If a start is received, all of your settings and hardware are working properly.

Did you find this to be helpful?

If so, share it with others using the buttons below!

FinishLynx Windows 10 Compatibility

FinishLynx is Fully Compatible with Windows 10

Since the release of Windows 10 in July 2015, our tech support team has received many questions about its compatibility with FinishLynx. We’re pleased to announce that the FinishLynx timing software and its components are fully compatible with the Windows 10 operating system.

If you want to upgrade your primary capture computer from Windows 7/8 to Windows 10, there should be no problems using the FinishLynx software to time races. However, there are some settings that should be double-checked after upgrading your operating system to Windows 10+. This includes changing the Windows power management settings, checking the firewall exceptions, and updating drivers for 3rd party hardware like USB-to-Serial Adapters.

Prevent Ethernet Issues by Disabling Windows 10 Power Saving Mode

Some users have reported issues with the ability of the Vision Power-over-Ethernet camera to load inside FinishLynx. Often, users will see the camera load within the software, only to have it red-line within moments. A simple fix to the power management settings of the Ethernet port can solve this issue. Please see the post below on how to disable power saving mode in Windows 10:

www.finishlynx.com/windows-10-ethernet-reliability/

USB-to-Serial Adapter Compatibility

ATEN usb-to-serial adapter

If you are upgrading from Windows 7 or an earlier version of Windows, we recommend that you update your computer’s USB drivers to ensure compatibility with the ATEN (UC232A), Prolific,  Sabrent, and other USB-to-serial adapters. All FinishLynx systems ship with the ATEN UC232A USB-to-serial adapter. As of July 2018, the latest version of the ATEN Windows driver is 1.0.084. You may also visit the ATEN website to see if any newer drivers have been released since this posting. Read more on Windows 8 driver compatibility

KEYLOK USB Dongle Driver for Windows 10

Some customers running Windows 10 may need to update the drivers for their KEYLOK USB Dongle. An older version of the KEYLOK drivers is included with both the ResulTV and NetExchange software. If you are experiencing issues with either of those programs while running Windows 10, we recommend you install the latest version of the KEYLOK dongle software. As of this posting (02/02/2016), the latest drivers were released on January 16, 2016. You can check for newer versions directly on the KEYLOK website.

We work with partners and customers to ensure that FinishLynx is rigorously tested with new operating systems. But as with any software, updates and security patches may introduce new bugs. If you notice any issues while operating FinishLynx on a Windows 10 device, please contact tech support with details about your problem, settings, and device. Customer bug reports are invaluable in discovering and patching issues that could potentially affect thousands of Lynx users.

Happy capturing!

PS, have you joined our FinishLynx Timers Facebook Group yet?

Update: FinishLynx USB Adapter Compatibility with Windows 8

Sabrent USB-to-Serial Adapter
USB-to-Serial Adapter

Our technical support team has tested FinishLynx version 8.2+ and determined that the software is fully compatible with Windows 8 and 8.1. However, some Lynx users have experienced compatibility issues problems with their USB-to-serial adapters. In some cases, out-of-date USB drivers may cause problems on Windows 8 devices – making them unable to connect properly. Fortunately, this is a very easy fix. Simply download the latest device drivers for your model of USB-to-serial adapter and install them on your Windows 8 devices. This will ensure compatibility on race day. The latest Windows 8-compatible drivers can be downloaded from manufacturer websites. We’ve also included some instructions below for some adapters commonly used with FinishLynx systems. Please update your USB drivers if you use Sabrent, Prolific, or ATEN serial converters. See the directions and downloads below.

Note: If you are upgrading your computer to Windows 8 and have a Sabrent USB-to-Serial adapter (see right), you must follow the instructions below in order to update the Sabrent drivers.

1. Download the USB Driver listed below

2.  Download the file below (Ser2pl64.sys)

3. Extract the file to your Windows 8 Driver folder

C:\Windows\System32\Drivers

Windows 8 Replace USB Driver Confirmation

4. Restart your computer with the new driver

Note: You may also purchase a new Serial-to-USB adapter to avoid any potential conflicts with 3rd party drivers. Simply contact Lynx or buy the adapter online from NewEgg.com.

New recommended usb-to-serial adapter

5. Your Driver Update is Complete


Prolific USB Adapter Compatibility

The directions above will work for all Sabrent USB-to-Serial Adapters that ship with FinishLynx. If you have the older “Prolific” model, you’ll need to use the following driver to ensure compatibility with Windows 8.

ATEN USB-to-Serial Converter

All current FinishLynx systems ship with ATEN USB-to-Serial Converters. We have not encountered any issues with Windows 8 compatibility. But we still recommend to you update your drivers to prevent any future issues. The latest ATEN drivers can be found below.

Pre-Season Checklist: Tips to Test & Prep Your System for Another Year

12 Tips to Help you Prepare for Another Season of Flawless Results

For many Lynx users, timing is a seasonal job that comes and goes with the fall, winter, and spring. Some of our service providers are busy timing events year-round. But we know that many others, including high school and college customers, put their systems in storage all winter. If your FinishLynx system has been hibernating all winter, we suggest you look through the pre-season checklist below. It’s a great way to make sure your cameras, cables, and connectors are ready for the spring season.  Performing these twelve steps will help you identify and prevent any unwanted surprises during your first meet of the year.

1. Perform a visual equipment check

Gather all the FinishLynx equipment, cables, and any other additional equipment added to the system. Do a relatively thorough inventory of all equipment and cables. Visually check that there is no obvious damage, rust, or corrosion to equipment and cables. If you don’t already have them, it is always beneficial to have spare network cables, serial cable, null modem cable, gender-changers and a 4- or 8-port switch.

2. Update your FinishLynx software to latest version

Open the FinishLynx software on your computer and go to Help | About. Verify that the latest version of FinishLynx is installed. As of October 2017, the latest version of FinishLynx is 10.03. Be sure that any other computers also have the latest version of FinishLynx installed. The latest software is available for free and can always be found on the FinishLynx software page under the downloads tab.

3. Verify that any software plug-ins are installed and up-to-date

Check FinishLynx plugins installed

If you own the LapTime, TimeTrial, or any other FinishLynx plug-ins, you may want to ensure that you have the latest versions. These plug-ins tend to have new devices or features added from time-to-time. The latest version of these plug-ins can be found on our website under the “Software Plugins” page. Please note that FinishLynx plug-ins must be purchased and require a serial number.

To verify that a plug-in is installed properly, open the FinishLynx software and go to Help | About. If there is a serial number displayed next to the plug-in, then that means it’s installed and should be working properly. But as with everything else, we recommend you test it just to be sure. If it says <not installed> then this could be due to a serial number entered incorrectly or because the plug-in was never installed. Verify your plug-ins on all computers that may be used with FinishLynx during the season. If you believe you purchased a plug-in but don’t have the serial number, please contact our customer support team for assistance.

4. Boot camera

(more…)

Lynx Timing and Photo Finish Seminar in Mexico

Classroom at FinishLynx Seminar
Classroom Learning

In early December 2013, Lynx System Developers, Inc. collaborated with the International Association of Athletic Federations [I.A.A.F.] and the Federación Mexicana de Asociaciones de Atletismo [F.M.A.A.] at a Digital Photo Finish and Timing seminar in Mexico City.

The three day seminar ran over three days and the timetable included:

  • A full day of FinishLynx system explanation, and classroom training
  • A ½ day of practical training at the Centro Deportivo Olimpico Mexicano
  • A further ½ day of advanced system configuration and operation
  • An athletics competion at the Centro Deportivo Olimpico Mexicano that was 100% timed by the participants.

Lynx provided two instructors, one Spanish speaking, and one from the Lynx Headquarters in the USAto present the information at the seminar. The FMAA organized the seminar, arranged accomodation for the instructors and the participants, and secured the cooperation of the Centro Deportivo Olimpico Mexicano in the project. The 24 particpants came from all parts of Mexico for the seminar.

FinishLynx Cameras
Participants brought their cameras to learn how to get the maximum from them